![]()

This package provides components for interfacing the ManiaMap procedural layout generator with Unity.
To add the package to a project, in Unity, select Window > Package Manager.

Select Add package from git URL... and paste the following URL:
https://github.com/mpewsey/ManiaMap.Unity.git
RECOMMENDED: To lock into a specific version, append #{VERSION_TAG} to the end of the URL. For example:
https://github.com/mpewsey/ManiaMap.Unity.git#v1.0.0
The following subsections outline how to procedurally generate a layout.
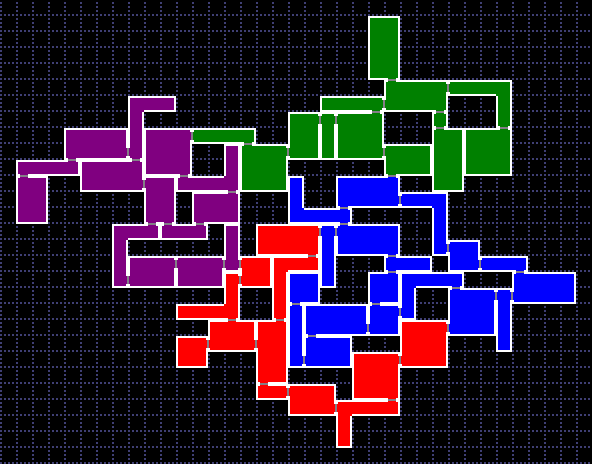
The generator creates rooms by pulling from user-defined rooms. To the generator a room is essentially a collection of cells in a grid, with information, such as door connections, assigned to them.
- Create a new
Roomby selectingGameObject > Mania Map > Room. Create a prefab for this Game Object that may be utilized later. - In the inspector, provide a name for the room, along with its width and height in terms of cells.
- Click the
Update Roombutton to generate the cells.

- In the scene view, select any empty cells and set the
Is Emptyflag in the inspector. The cell Gizmos will show crossed out for empty cells.

- Next, add all possible doors and collectable spots to the room per the following sections.
- Create a new
Doorby selecting the Room Game Object thenGameObject > Mania Map > Door. The door should be added as a child of the room. - At this point, you should probably create a prefab for the door with art supporting the particular direction, along with all applicable events. However, those specifics are beyond the scope of this example.
- Position the door at the desired location within the room and assign its direction and connection constraints.
- To auto assign the closest cell and direction to the door, make sure the applicable flags are selected and click the
Auto Assignbutton. Note that theUpdate Roombutton on the Room component will also perform this operation on all doors in the room.

- Create a new
CollectableSpotby selecting the Room Game Object thenGameObject > Mania Map > Collectable Spot. The collectable spot should be added as a child of the room. - At this point, you should probably create a prefab for the collectable spot with art (treasure chest, orb, sparkle, etc.) and all applicable events. However, those specifics are beyond the scope of this example.
- Position the collectable spot at the desired location within the room and assign a collectable group to it (
Assets > Mania Map > CollectableGroup). - To auto assign the closest cell to the collectable spot, make sure the applicable flag is selected and click the
Auto Assignbutton. Note that theUpdate Roombutton on the Room component will also perform this operation on all collectable spots in the room.

- Ensure that any rooms are saved as prefabs within the project. Next, select
Mania Map > Batch Save Templatesfrom the menu to save room templates for all room prefabs discovered within the project. Note that the settings for this action may be configured in the settings atResources/ManiaMap/TemplateSaveSettingsonce the action has been run once.
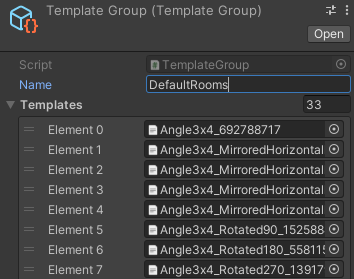
- Create a
TemplateGroupby selectingAssets > Mania Map > Template Group. - In the inspector, provide a unique name to the group and add any of the generated room templates you wish to associate with the group to the list.
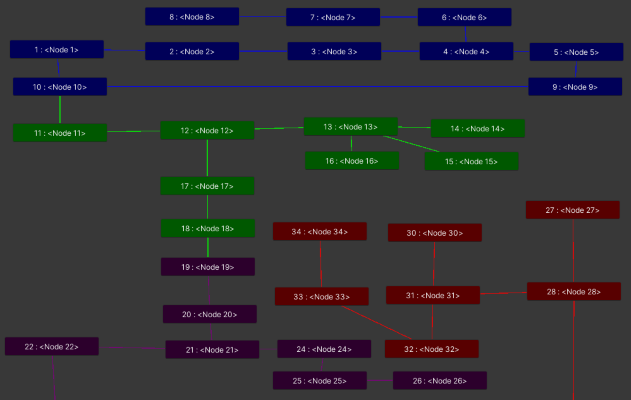
- Create a
LayoutGraphby selectingAssets > Mania Map > Layout Graph. - Double click on the asset to open the graph editor.
- Add rooms (nodes) to the graph by right-clicking in the graph area and selecting
Add Node. - In the inspector, add a template group to the selected nodes to associate the room templates that may be used at those locations.
- Add edges to the graph by right-clicking a node, selecting
Add Edge, then selecting another node. - To edit the edge attributes, ensure that
View > Toggle Edge Displayis enabled, then select the edges in the graph area.
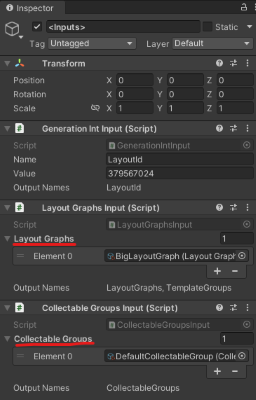
- Create a
GenerationPipelineby selectingGameObject > Mania Map > Generation Pipeline. - Select the child
<Inputs>Game Object and add any layout graphs and collectable groups you wish to associate with the generator to the inputs.
- To run the pipeline and generate a layout, run the
Runmethod from a script.
var results = Pipeline.Run();

// Retrieve the generated layout data from the ouput results
var layout = results.GetOutput<Layout>("Layout");